
Reinstall or recover the Edge agent
Bring the agent back under its original Edge ID, and fix upgrades that fail with permission denied.
The agent is gone, was reinstalled, or will not upgrade — but the Edge and its devices in the portal are untouched. In every case below you keep the same Edge and the same devices; nothing needs re-claiming.
If your Edge agent needs to be reinstalled — because its Docker container is gone, Docker or the operating system was reinstalled, or the machine was rebuilt — you can bring the Edge back under its original Edge ID without re-claiming anything or losing devices. The new agent reconnects as your existing Edge, and its devices come back on their own.
When to use this
Use this guide whenever you need to stand the Edge agent back up on the same (or a rebuilt) machine and keep your existing Edge and its devices. Common cases:
- The
xyte_edgecontainer was removed — e.g. a Docker Desktop reset or reinstall, a WSL reset, or a manual removal. - Docker or the operating system was reinstalled, or the machine was rebuilt / replaced.
- You had to reinstall the agent for any other reason.
First, check whether the container is actually gone (rather than just stopped). Open Docker Desktop (Containers) or run on the host machine:
docker ps -a- If
xyte_edgeis not listed at all → the container was removed. Continue with the steps below. - If
xyte_edgeis listed as Exited / Stopped → it wasn't removed, just stopped. Simply start it and you're done:docker start xyte_edge
First confirm the Edge is actually offline in XyteIn some environments the
xyte_edgecontainer may not appear indocker ps -aeven though it's still running (for example when Docker runs in a separate context, VM, or nested engine). So a missing container isn't proof on its own. Check the Edge's status in the Xyte portal first — if it still shows Online, it isn't gone and there's nothing to recover. Only continue if the Edge is offline in the portal.
Recover the Edge
You keep your existing Edge exactly as it is — you simply install a fresh agent and point it back at your Edge's original ID. There's no need to claim a new Edge, and nothing to delete: the new container reconnects as your original Edge, and its devices come back on their own.
Step 1 — Copy your Edge ID
In the portal, open Edges, click the ⋯ menu on your Edge → Edit Edge, and copy the value shown in the Edge ID field. Keep it handy — you'll paste it in Step 3.
Step 2 — Install the agent (stop before "Connect Edge")
Follow the installation guide only until thexyte_edgecontainer is up and running — then STOP. Do not continue to Step 6 ("Connect Edge") and do not enter an Edge ID in the portal.
Skip the "Connect Edge" stepDo not complete the "Connect Edge" step (Step 6 of the installation guide) and do not enter any Edge ID in the portal. That step claims a new Edge — which you don't want here.
The container starts with its own new Edge ID, but you'll replace it in the next step so it reconnects as your existing Edge. Once the container is running, come straight back here.
Step 3 — Set your original Edge ID in proxy_name.txt
proxy_name.txtUse the method that matches your setup.
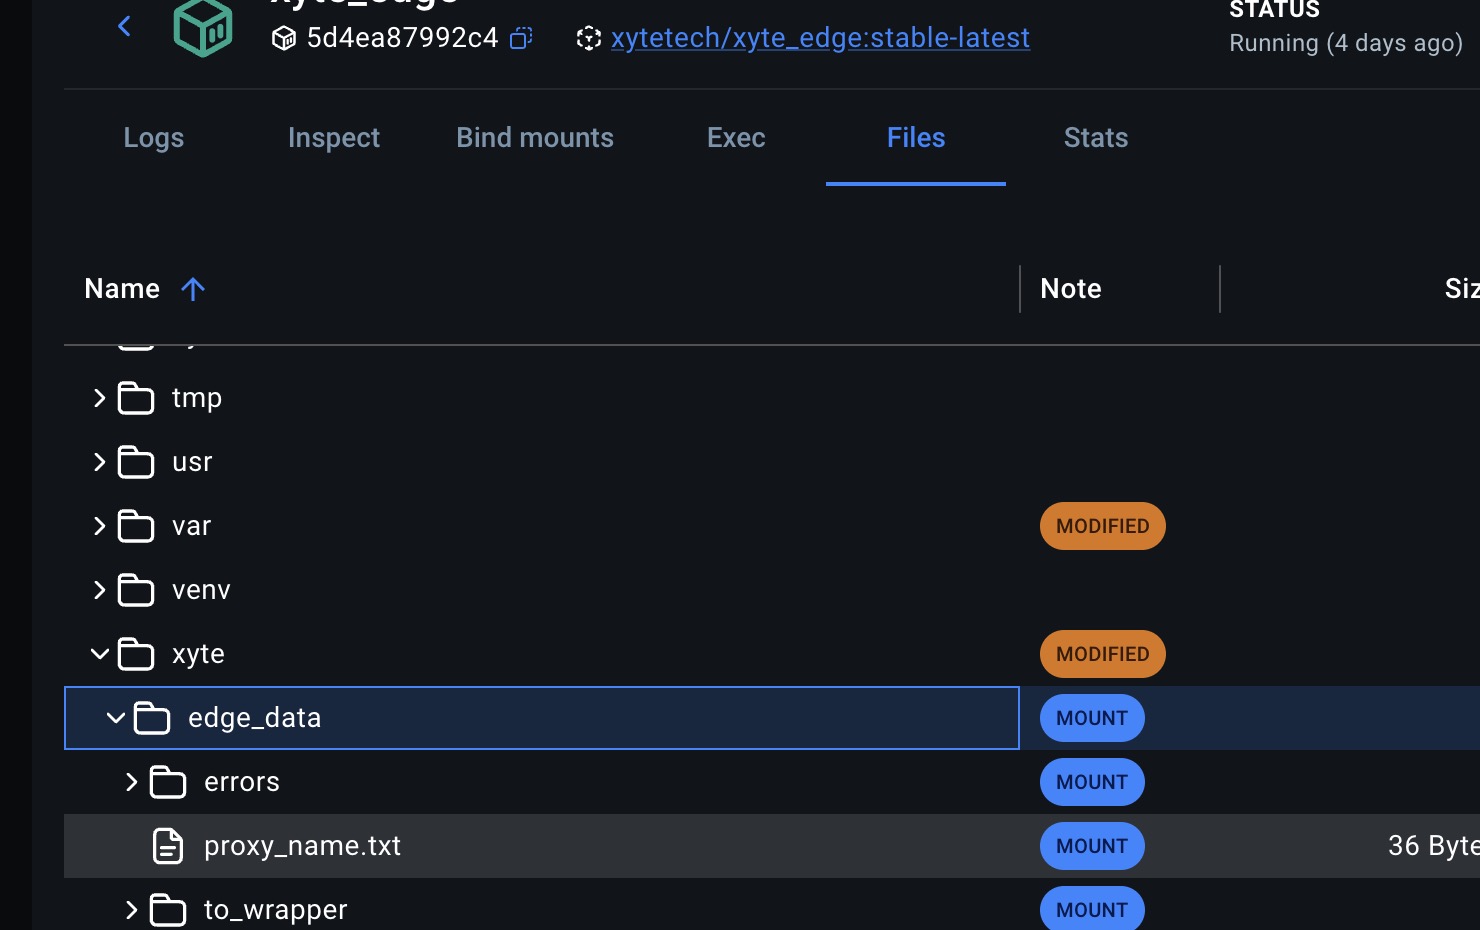
Docker Desktop (Windows / macOS) — the file is inside the container, edited from the Files tab:
-
Open Docker Desktop → Containers, and click the
xyte_edgecontainer. -
Open the Files tab.
-
Expand
xyte→edge_data, and clickproxy_name.txt. -
Click into the editor, select all of the existing text, and replace it with the Edge ID you copied in Step 1 (nothing else — no quotes, no extra spaces or blank lines).

-
Click Save changes.
Command line (Linux) — edit the file inside the container (so its permissions stay correct). Exec in and open it in an editor:
docker exec -it xyte_edge sh
vi /xyte/edge_data/proxy_name.txt   # replace all contents with your Edge ID, save, then exit
Then confirm the container reads it back correctly:
docker exec xyte_edge cat /xyte/edge_data/proxy_name.txtIt should print exactly your Edge ID. (If the slim image has no vi, write it without an editor instead: docker exec xyte_edge sh -c "printf '<EDGE_ID>' > /xyte/edge_data/proxy_name.txt".)
Make sure the container can read the file
edge_datais shared between the host and the container. If you editproxy_name.txtfrom the host and it ends up owned by — or readable only by — your host user, the agent (which runs as a different user inside the container) can't read it. On restart it then generates a brand-new Edge ID, and your devices won't reconnect.Editing via the Docker Desktop Files tab or
docker exec(above) avoids this, because the file is written from inside the container. Either way, confirm the container reads back your original Edge ID before restarting.
Step 4 — Restart the container
The agent only reads the Edge ID when it starts, so it must be restarted after the edit.
- Docker Desktop: on the Containers list, use the Restart action on
xyte_edge(or Stop, then Start). - Command line:
docker restart xyte_edge
Step 5 — Verify
Within a few minutes your Edge shows Online in the portal under its original ID, and its devices reconnect on their own.
If a new Edge appears online instead of your original one, the container couldn't read proxy_name.txt (a permissions issue — see Step 3): re-apply the Edge ID from inside the container, confirm it reads back correctly, and restart again. If any device still doesn't come back, contact Xyte support.
Why this worksAn Edge's identity is simply its Edge ID. Reinstalling the agent and pointing it back at your original Edge ID brings the Edge back under the same ID.
Symptom
Upgrading the Edge agent from the Xyte portal fails — the upgrade command ends with an Error status, and the command output / agent logs show:
/usr/lib/zabbix/externalscripts/update.sh: line 22: can't create /xyte/edge_data/to_wrapper/update_request.txt: Permission denied
Update Requested to: 1.3.4
(The target version in the log will match whatever version you attempted to upgrade to.)
Cause
The upgrade script writes an update request file into the shared directory /xyte/edge_data/to_wrapper inside the Edge container. On some installations these shared directories lose their expected group ownership — they should be owned by group dockeraccess (GID 2001).
Note that checking permissions alone can be misleading: the directories may still show 770, which looks correct. The giveaway is the ownership column showing UNKNOWN:UNKNOWN instead of root:dockeraccess. With 770 permissions and no valid group, the update script has no write access and cannot create update_request.txt.
Diagnose
On the machine or VM running the Edge Agent, check ownership and permissions of the shared directories:
docker exec xyte_edge stat -c "%U:%G %a %n" /xyte /xyte/edge_data /xyte/edge_data/to_wrapperHealthy output looks like:
root:dockeraccess 770 /xyte
root:dockeraccess 770 /xyte/edge_data
root:dockeraccess 770 /xyte/edge_data/to_wrapper
If any line shows UNKNOWN:UNKNOWN, the group ownership was lost and the upgrade will fail with the error above.
Commands inside thexyte_edgecontainer run as root already — there is nosudoand nozabbixuser in that container, so run the commands exactly as shown from the host.
Fix
Run this on the host:
docker exec xyte_edge sh -c 'chown -R :2001 /xyte/edge_data && chmod 770 /xyte/edge_data /xyte/edge_data/to_wrapper /xyte/edge_data/errors'Verify:
docker exec xyte_edge stat -c "%U:%G %a %n" /xyte/edge_data /xyte/edge_data/to_wrapperBoth lines should now show group dockeraccess with 770. Then retry the Edge agent upgrade from the Xyte portal — it should complete successfully.
Last updated: 2026-09-14
Updated 22 days ago