
Accessing the BMC Portal
Overview
The Secure Edge has a dedicated BMC (Baseboard Management Controller) port — a separate management interface, independent of the appliance's operating system, that serves a web portal for remote power control and console access.
This page is for users who want to reach that portal themselves. The only real obstacle is finding the IP address the BMC port received, since it is a different address from the ones your Secure Edge uses to monitor devices.
Three steps: connect the port → find its IP → open the portal.
Step 1 — Connect the BMC port
Connect the port labelled BMC to your network with a standard Ethernet cable.
| Marking | What it is |
|---|---|
| BMC | Dedicated 1GbE management port. This is the one you want. |
| BMC CONSOLE | Mini-USB serial console, used only for recovery when the BMC has no IP address. |
The BMC requests an address over DHCP, so on a normal network it will have one within a few seconds of link-up. It does not share an address with the two 2.5GbE data ports.
Anyone who can reach this port has full control of the appliance, including power and remote media. Keep it on a management network or VLAN, and never expose it directly to the internet.
Step 2 — Find the BMC IP address
The BMC has its own MAC address, and it is printed on the label on the bottom of the unit. The label lists all three of the appliance's MAC addresses in a compressed form — a full address followed by the last byte of the other two:
MAC Addresses: 00:00:01:0A:2B:46/47/48That means 00:00:01:0A:2B:46, 00:00:01:0A:2B:47 and 00:00:01:0A:2B:48.
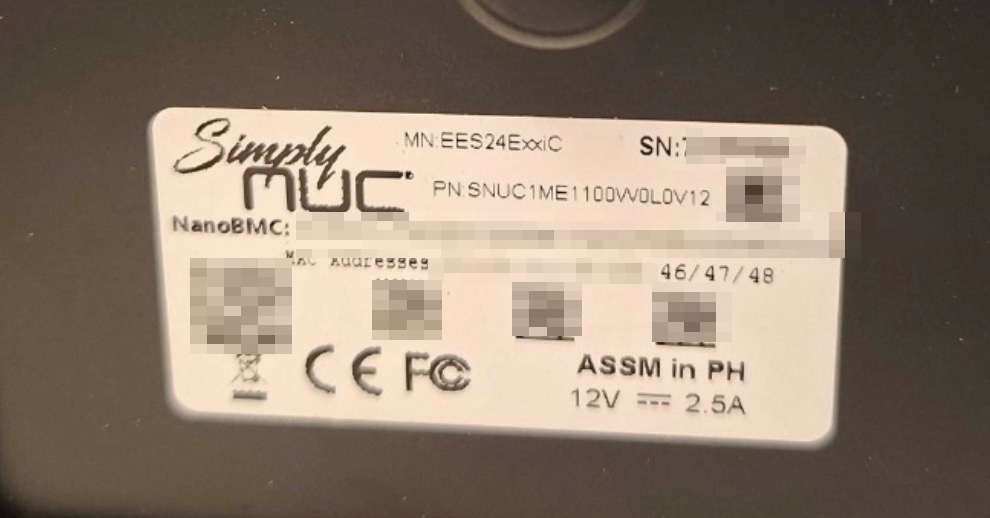
The first address in that list is the BMC port on the units we have checked, so start with it —00:00:01:0A:2B:46in the example above. The other two belong to the 2.5GbE data ports. This ordering is not guaranteed by the manufacturer, so if the first address does not lead to the portal, repeat the lookup with the second and third and use the check in Option 3 to confirm which one answered.
Option 1 — Ask your DHCP server (recommended)
Look up the active lease for the first MAC address on the label. This puts no traffic on the network at all and is the fastest route on any managed network — Windows Server DHCP under Address Leases, or the client list of your firewall or wireless controller, searching by MAC address.
Option 2 — Listen for that one MAC address
If you cannot query the DHCP server, watch for the BMC directly. This command only listens — it sends nothing and touches no other device on the network, so it is safe on a large production network.
Run it on a computer on the same subnet, replacing the MAC with the first one from your label and the interface with your own:
# macOS
sudo tcpdump -i en0 -n ether host 00:00:01:0A:2B:46

# Ubuntu / Debian   (install with: sudo apt install tcpdump)
sudo tcpdump -i eth0 -n ether host 00:00:01:0A:2B:46

# RHEL / CentOS / Rocky   (install with: sudo dnf install tcpdump)
sudo tcpdump -i ens192 -n ether host 00:00:01:0A:2B:46
Use ip link (Linux) or ifconfig (macOS) if you are unsure of your interface name.
With the capture running, unplug the BMC network cable and plug it back in. The BMC immediately requests an address, and its IP appears in the output — look for the DHCP exchange or the ARP announcement carrying that MAC. Press Ctrl-C to stop.
Option 3 — Check the neighbour table you already have
If your computer has already communicated with the BMC, the address is cached locally. No packets are sent.
# Linux (Ubuntu, Debian, RHEL, CentOS, Rocky) — the table stores the full MAC
ip neigh | grep -i 00:00:01:0A:2B:46

# Linux — same lookup, printing only the IP address
ip neigh | awk -v m=00:00:01:0a:2b:46 'tolower($5)==m {print $1}'

# Windows (PowerShell) — Windows uses dashes
arp -a | Select-String "00-00-01-0a-2b-46"

# macOS — strips leading zeros when printing, so normalise both sides first
MAC=00:00:01:0A:2B:46
NORM=$(awk -F: '{s="";for(i=1;i<=NF;i++){b=tolower($i);sub(/^0+/,"",b);if(b=="")b="0";s=s (i>1?":":"") b}print s}' <<<"$MAC")
arp -an | awk -v m="$NORM" '
function n(x,   a,i,b,s){s="";i=split(tolower(x),a,":");for(k=1;k<=i;k++){b=a[k];sub(/^0+/,"",b);if(b=="")b="0";s=s (k>1?":":"") b}return s}
n($4)==m {gsub(/[()]/,"",$2); print $2}'
The macOS normalisation is not optional. macOS stores the label MAC00:00:01:0A:2B:46as0:0:1:a:2b:46, so searching for the printed form finds nothing at all.
Option 4 — Subnet sweep (small networks only)
Only on a small or lab network, and with the agreement of whoever runs it. This pings every address on the subnet, which is noisy, can raise intrusion-detection alerts, and is not appropriate on a production network with hundreds or thousands of devices. Prefer Options 1 to 3.
for i in $(seq 1 254); do ping -c1 -W 200 192.168.1.$i >/dev/null 2>&1 & done; waitThen read the result with the neighbour-table command for your platform in Option 3.
On Linux, arp-scan does both halves in one targeted command. It uses ARP rather than ping, so it is lighter than the sweep above, but it is still active traffic — treat it the same way:
sudo apt install arp-scan          # Debian / Ubuntu
sudo dnf install arp-scan          # RHEL / CentOS / Rocky

sudo arp-scan --interface=eth0 --localnet | grep -i 00:00:01:0A:2B:46 | awk '{print $1}'
Confirm you found the BMC and not a data port
If more than one address is a candidate, this tells you which one is the BMC. It serves a management API:
curl -k https://<candidate_ip>/redfish/v1The BMC returns a block of JSON. The Secure Edge operating system exposes no open ports, so its data interfaces return nothing.
If nothing is found at all, the BMC is not on this subnet, the cable is in a data port rather than the one marked BMC, or the unit is unpowered.
Step 3 — Open the BMC portal
- Browse to
https://<bmc_ip>. - The BMC uses a self-signed certificate. The browser warning is expected — accept it and continue.
- Sign in with the BMC credentials supplied with your unit. If you do not have them, contact Xyte support.
Overview confirms you are in the right place: it shows the appliance model and serial number, the BMC firmware version, the hostname nanobmc, and — under Network information — the address currently in use.
What the portal gives you
| Page | What it does |
|---|---|
| Operations → Server power operations | Current power state, Reboot (graceful or forced) and Shut down (graceful or forced). Works even if the operating system is unresponsive. |
| Operations → SOL console | Serial-over-LAN terminal into the Secure Edge operating system, usable when the appliance is unreachable over the data network. |
| Operations → Virtual media | Mount an ISO or disk image over the network — how a Secure Edge is re-installed remotely. |
| Operations → Firmware | View and update BMC firmware. A running image and a backup image are kept. |
| Operations → Reboot BMC | Restarts the management controller only. The Secure Edge itself keeps running. |
| Settings → Network | Hostname, static IP configuration, DNS and NTP servers. |
| Hardware status / Logs | Inventory, sensor readings and the event log. |
Operations → Factory reset resets BMC settings. Do not use it unless Xyte support asks you to.
Optional — give the BMC a fixed address
If you would rather not look the address up again:
- Go to Settings → Network and select the eth0 tab.
- Under IPv4, turn off DHCP and add a static address, subnet mask and gateway.
- Save. The session drops — reconnect on the new address.
A DHCP reservation on your own server achieves the same thing without touching the appliance.
If the BMC never gets an IP address
Use the serial console:
- Connect a Mini-USB cable from BMC CONSOLE to your computer.
- Open a serial terminal at 115200 baud, 8 data bits, no parity, 1 stop bit, no flow control.
- macOS:
ls /dev/tty.usbserial-*thenscreen /dev/tty.usbserial-XXXX 115200 - Windows: install the FTDI VCP driver, then use PuTTY in Serial mode
- macOS:
- Power on the unit and allow about 40 seconds for the BMC to boot.
- Sign in with the BMC credentials, then set a permanent address from Settings → Network in the portal.
Give the Secure Edge a static IP from the SOL console
The Secure Edge expects to receive its address over DHCP. On a network that has no DHCP server — or where the appliance must keep a fixed address — set the address by hand from the SOL console, which reaches the appliance's operating system even when it has no working network connection at all.
The Secure Edge runs Ubuntu, and its network is configured with netplan.
If you do have a DHCP server, a reservation for the Secure Edge is simpler and safer than the steps below — it achieves the same fixed address without changing anything on the appliance.
Step 1 — Open the console and sign in
- In the BMC portal, go to Operations → SOL console.
- Press Enter to wake the login prompt.
- Sign in with the appliance credentials recorded when the unit was installed. If you do not have them, contact Xyte support.
The prompt shows the machine's hostname, not your username. Run the commands below with sudo, entering the same password when asked.
Step 2 — Find the interface you are configuring
ip -br addrEach line is one network interface: name, state, addresses. Choose the one that is UP and holds the cable to your network — the two 2.5GbE data ports usually appear as enp1s0 and enp2s0.
Leave the maintenance-port interface alone. It is reserved for on-site support, and changing it removes that route in. If you are not sure which interface that is, contact Xyte support before making changes.
Step 3 — Write the static configuration
Netplan reads every file in /etc/netplan/ in name order, so a new file numbered 99- overrides the shipped DHCP setting without editing it:
sudo nano /etc/netplan/99-xyte-static.yamlEnter the following, substituting your own interface name, address, gateway and DNS servers:
network:
  version: 2
  ethernets:
    enp1s0:
      dhcp4: false
      addresses: [192.168.1.50/24]
      routes:
        - to: default
          via: 192.168.1.1
      nameservers:
addresses: [192.168.1.1, 8.8.8.8]192.168.1.50/24is the address you are assigning, with the prefix length of your subnet (/24= mask255.255.255.0).via:is your gateway — the router the appliance reaches the internet through.- DNS is required. The appliance resolves
eu1.edge.xyte.io, so without working name servers it stays offline even with a correct address.
YAML is indentation-sensitive: two spaces per level, spaces only, never tabs. Save with Ctrl-O, Enter, then leave the editor with Ctrl-X.
Netplan expects its files to be readable only by root:
sudo chmod 600 /etc/netplan/99-xyte-static.yamlStep 4 — Apply it
sudo netplan tryThis applies the configuration and rolls it back automatically after 120 seconds unless you confirm by pressing Enter. If it reports an error instead, the file has a syntax or indentation problem — reopen it and correct the line it names.
Once confirmed, make it permanent:
sudo netplan applyStep 5 — Check it works
ip -br addr show enp1s0          # the new address is listed
ping -c3 192.168.1.1             # the gateway answers
getent hosts eu1.edge.xyte.io    # DNS resolves
curl -sI https://eu1.edge.xyte.io | head -1   # port 443 is reachable
With all four succeeding, the Edge reconnects on its own within a few minutes — confirm it in the Xyte portal under Connections → Edges. If it is still offline after ten minutes, restart the appliance from Operations → Server power operations.
Reverting to DHCP
sudo rm /etc/netplan/99-xyte-static.yaml
sudo netplan apply
Troubleshooting
| Symptom | What to check |
|---|---|
| The MAC lookup returns nothing | Confirm the cable is in the port marked BMC and not a data port, check the link LED, and confirm you swept the right subnet. On a Mac, make sure you used your real LAN interface — a virtual-machine bridge (often 192.168.64.1) is not your network; check ifconfig. |
| The portal will not load | It is HTTPS with a self-signed certificate on a bare IP address. Some restricted or embedded browsers refuse this outright — use a standard desktop browser and accept the warning. |
| SOL console connects but is blank | Press Enter to wake the login prompt. |
| Serial console silent | Wrong serial port or speed. It is 115200, 8-N-1, no flow control. |
netplan try rejects the file | YAML is indentation-sensitive — two spaces per level, spaces only, never tabs. The error names the line at fault. |
| A static address is set but nothing is reachable | The gateway is wrong, or the address is outside the subnet that gateway serves. Check with ip route. |
| Address and gateway are correct but the Edge stays offline | Name resolution or outbound access: getent hosts eu1.edge.xyte.io must resolve, and outbound 443 to that host must be allowed. |
See also: Installation
Updated about 1 month ago