
Freshdesk
Connect Freshdesk to Xyte for two-way ticket sync. Xyte device incidents automatically open, update, and close Freshdesk tickets — and, optionally, changes made in Freshdesk sync back to Xyte.
The Freshdesk integration keeps device incidents in sync between Xyte and your Freshdesk helpdesk.
- Outbound (Xyte → Freshdesk) — when Xyte raises a device incident it creates a matching Freshdesk ticket, pushes updates when the incident changes, and resolves (or closes) the ticket when the Xyte incident is resolved. This works as soon as the integration is connected and enabled.
- Inbound (Freshdesk → Xyte) — optional. When an agent updates or resolves the ticket in Freshdesk, the change can flow back to Xyte. This is set up with a small Freshdesk Automation Rule (see Two-way sync).
Before you start
You'll need:
- Your Freshdesk subdomain — the prefix of your helpdesk URL. If your helpdesk is
https://acme.freshdesk.com, the subdomain isacme. - A Freshdesk agent API key. In Freshdesk, click your profile picture → Profile Settings → View API Key.
- A requester email — set as the requester on every ticket Xyte creates. It defaults to the connected agent's email once you connect, but a dedicated address (e.g.
[email protected]) is recommended: it makes Xyte's tickets easy to recognize and to filter on (see Two-way sync).
Use a dedicated agent seatCreate an agent just for this integration and use its API key. Tickets Xyte opens are attributed to that agent, the key grants exactly that agent's permissions, and you can revoke access without affecting anyone else. The agent needs permission to create and edit tickets.
Step 1 — Connect in Xyte
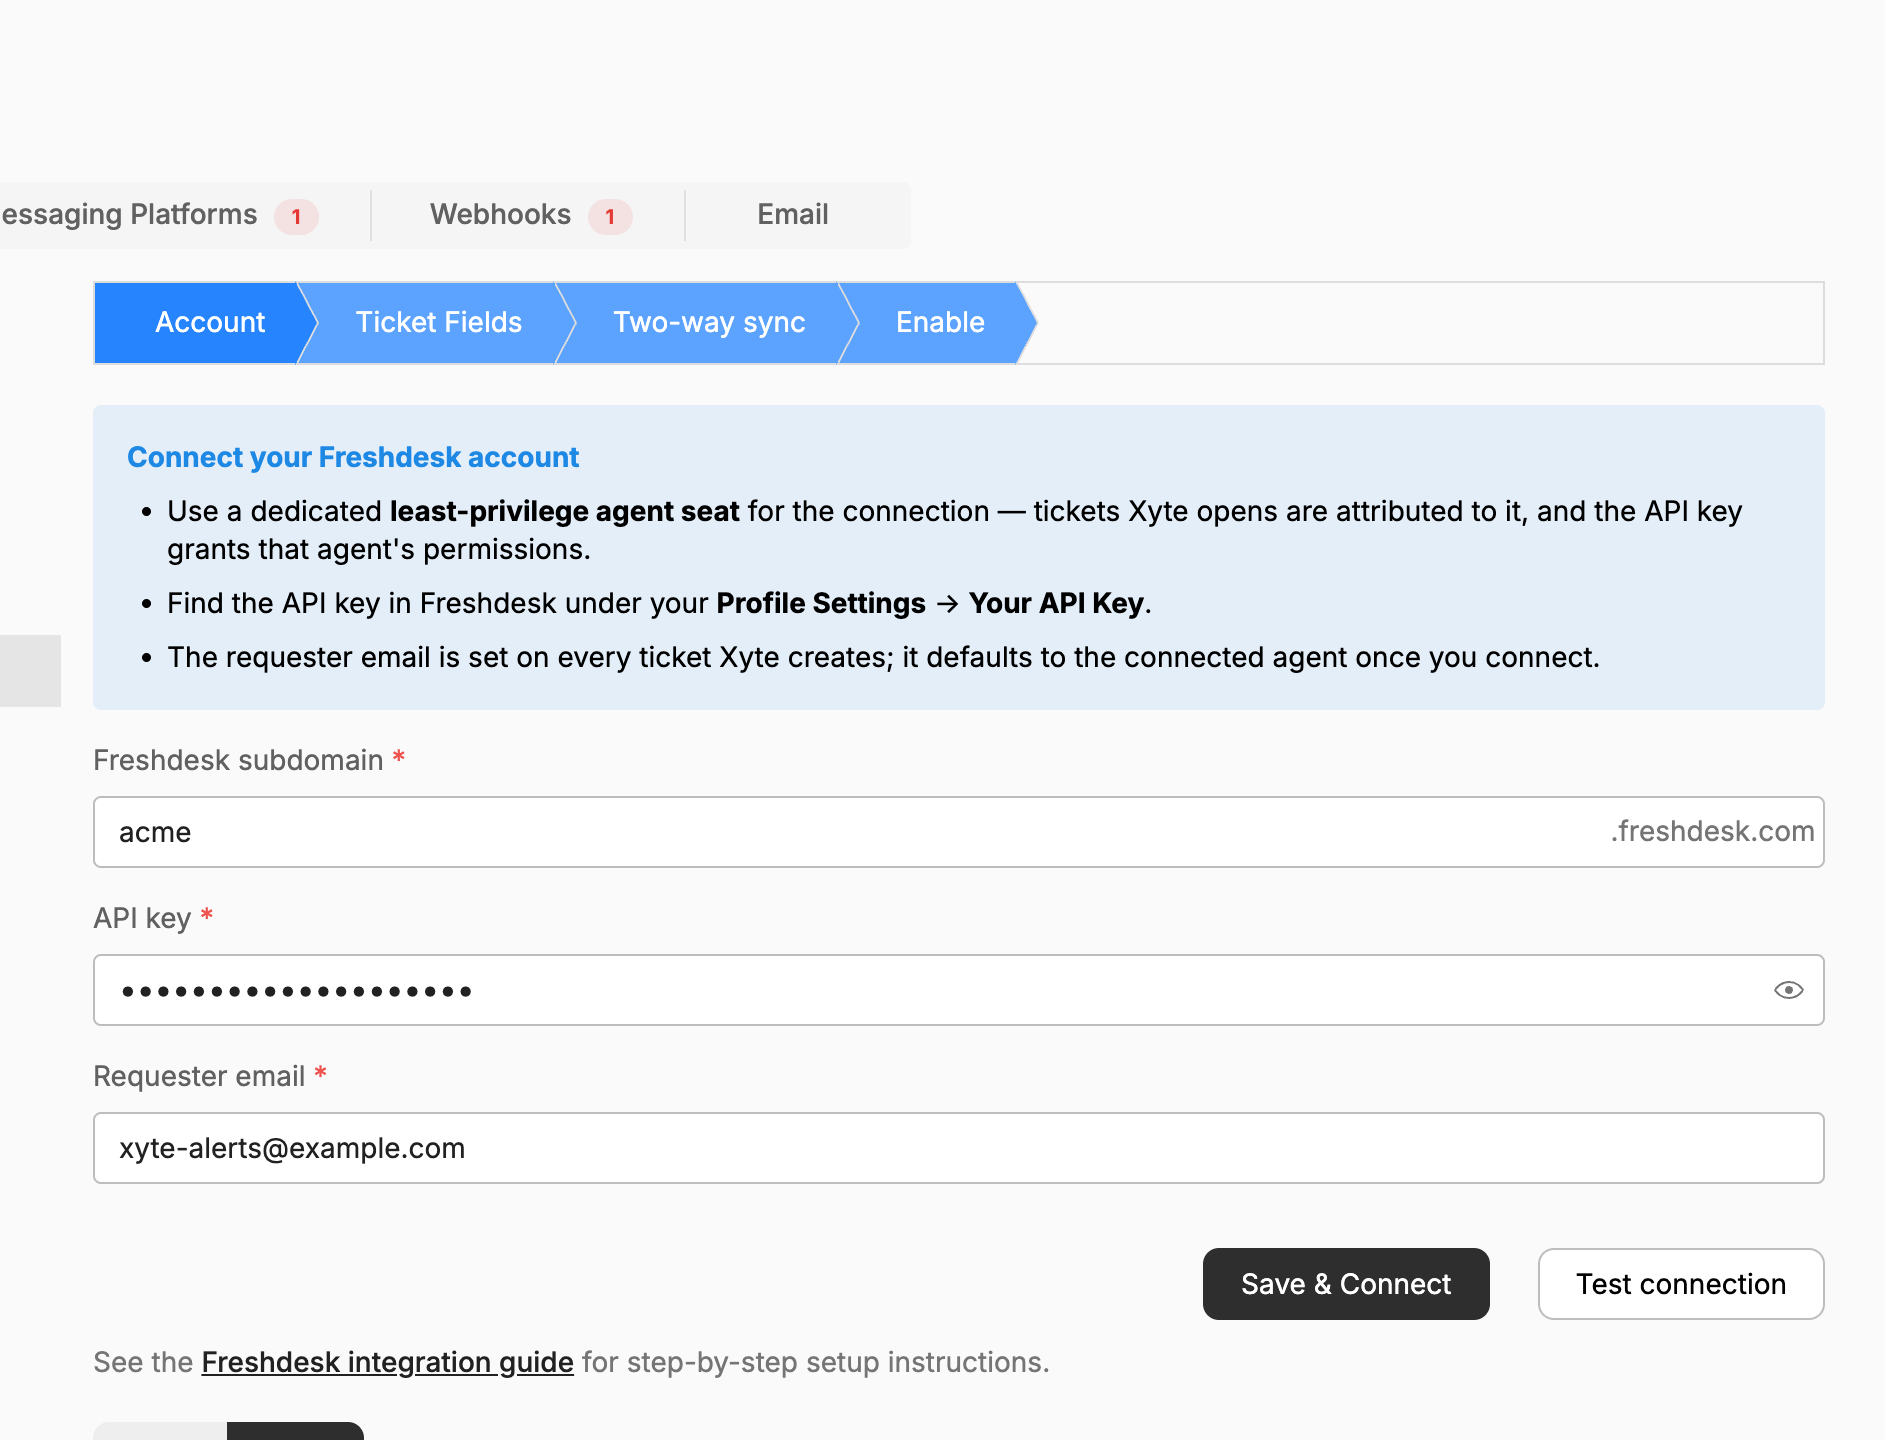
- In the Xyte Organization portal, open Settings → Integrations → Ticketing System and choose Freshdesk.
- Work through the connect wizard:
- Account — enter the subdomain, the agent's API key, and the requester email, then Test connection and Save & Connect.
- Ticket Fields (optional) — pick the close status and map extra fields. See Ticket fields.
- Templates (optional) — customize the ticket's subject and description. See Ticket text templates.
- Two-way sync (optional) — set up the inbound webhook. See Two-way sync.
- Filtering (optional) — report only incidents at or above a chosen priority.
- Enable — turn the integration on.
Every step saves itselfEach step has its own save button — Save & Connect, Update, Save templates, Save filtering, Activate. The Prev / Next buttons only move between steps and save nothing, so leaving a step without clicking its own button discards what you entered there.
Once enabled, the next Xyte device incident will create a Freshdesk ticket automatically: the subject is the incident title, the description carries the full device/space context, and the Xyte priority maps to the Freshdesk priority (Critical → Urgent, High → High, Moderate → Medium, Low/Planning → Low).
Ticket fields (optional)
The Ticket Fields step controls how tickets are closed and lets you map additional Freshdesk fields:
- Close status — the status Xyte sets when the incident is resolved. Resolved (recommended) leaves Freshdesk's own closure workflow, CSAT surveys, and auto-close automations intact; Closed is terminal.
- Required-for-closure fields — if your Freshdesk account requires certain fields before a ticket can be resolved/closed, set their values here so Xyte's close isn't rejected. Dropdown choices are loaded from your account.
- Custom field mapping — add a row per Freshdesk custom field and choose a source:
- Static value — a fixed value (e.g.
category = Hardware). - Xyte field — pulled from the Xyte device/incident: device name, serial, MAC, model, vendor, space name, incident ID, incident priority, incident status, or organization name.
- Static value — a fixed value (e.g.
- Xyte's own canonical fields (subject, description, priority, status, requester) always take precedence over custom mappings.
Ticket text templates (optional)
The Templates step controls the two text fields Xyte writes on every Freshdesk ticket it creates: the subject and the description. Both are optional — leave a field blank and Xyte keeps its built-in behavior (the incident title for the subject; the full structured device/space details for the description).
Type any text and insert {key} placeholders, which are replaced with that incident's values when the ticket is created — for example:
{title} - {priority} - {space_name}The step has two fields and one button:
- Subject template — a single line. Its placeholder text shows the default,
{title}. - Description template — a multi-line field. Leave it blank for the default structured details.
- Save templates — saves both fields. The step is the third in the wizard, after Ticket Fields.
Clicking a key under Available keys appends it to the description field, not to the subject — type placeholders into the subject yourself.
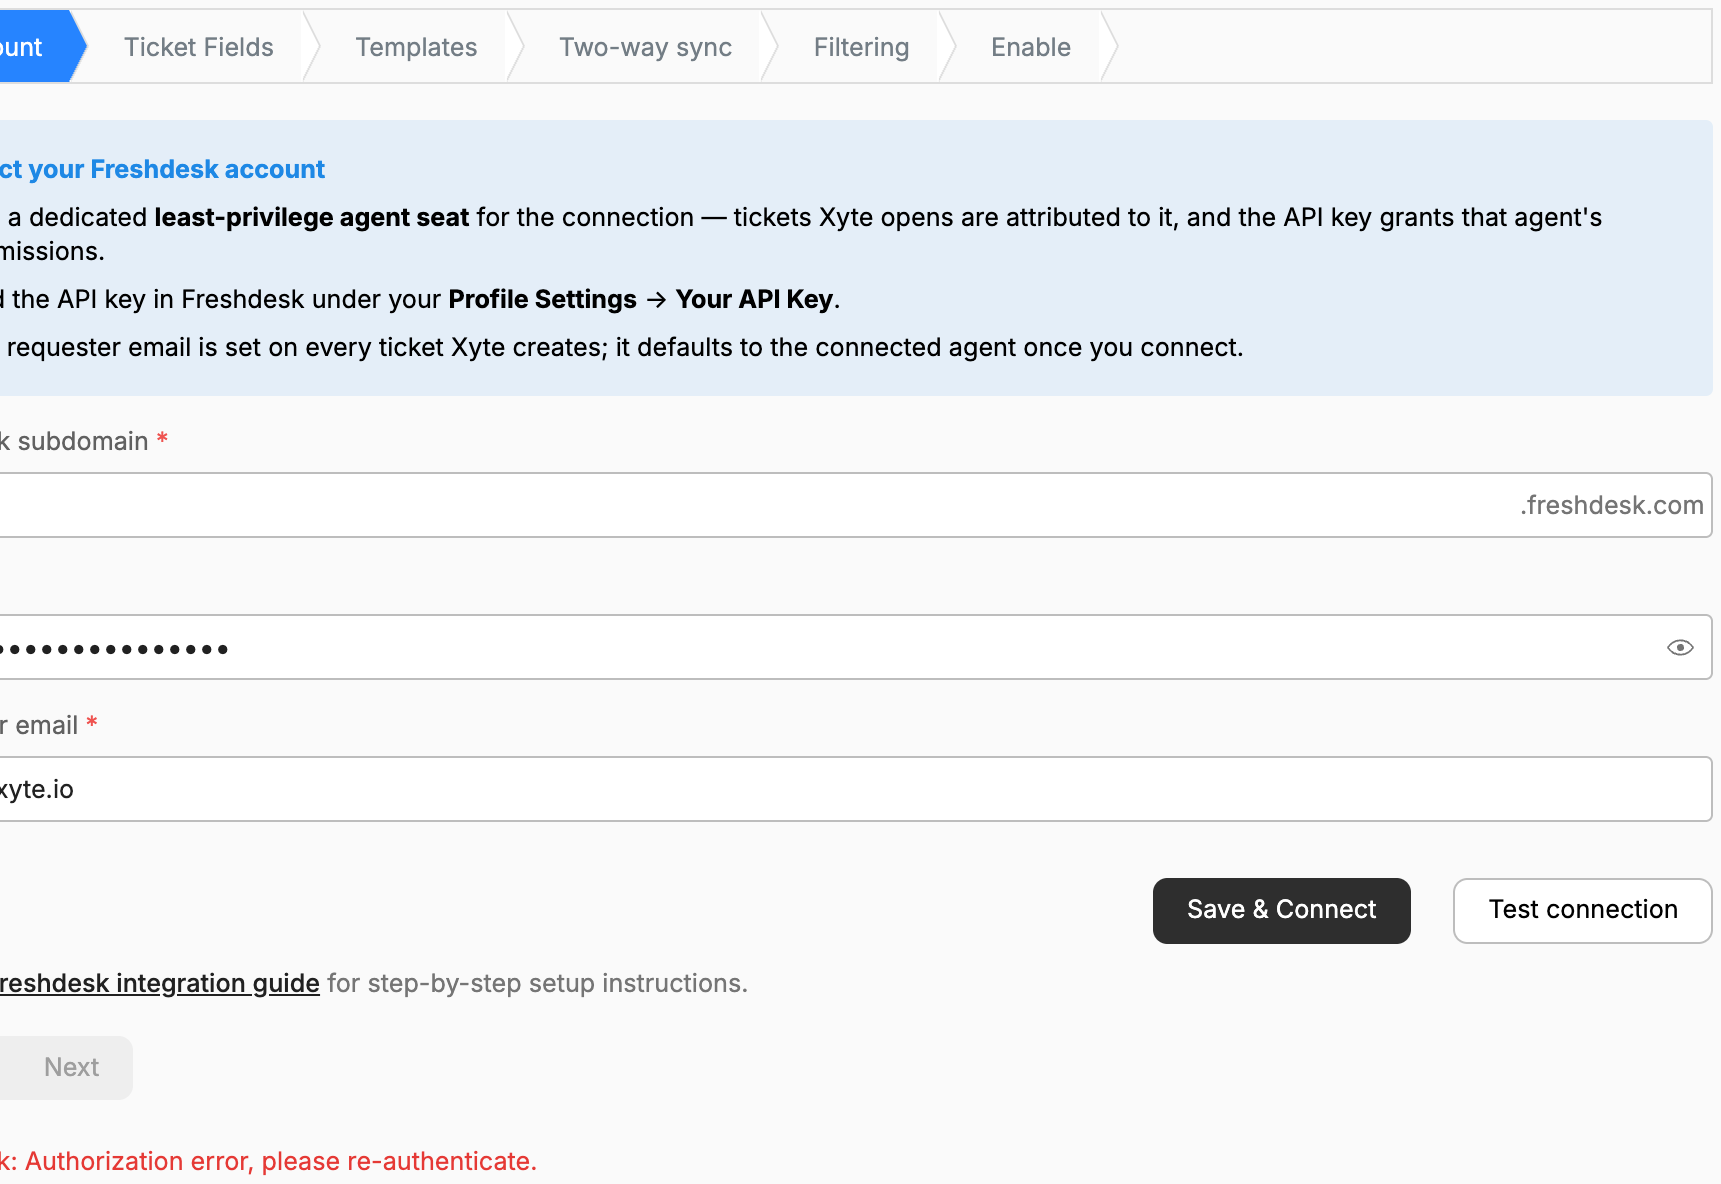
How placeholders behave
- A key with no value for that incident renders as nothing, and the rest of the line is kept.
- An unrecognized key (a typo, for example) is sent through as written, so a mistake is visible in the ticket rather than silent.
- Only letters, digits and underscores are recognized inside the braces:
{space_name}works,{space name}is left as plain text. - The subject template is applied when the ticket is created and on every later update. The description template is applied only at creation — Xyte deliberately never rewrites the description afterwards, so a two-way sync can't echo it back and forth.
- Freshdesk's description is an HTML field, so Xyte sends your rendered template as preformatted plain text. Line breaks are preserved; HTML and markdown are not interpreted.
Available keys
| Placeholder | Description | Example |
|---|---|---|
{title} | Incident title | Camera offline |
{description} | Incident description | Device stopped responding |
{incident_id} | Short incident ID | 4821 |
{status} | Incident status | Open |
{priority} | Priority — Critical, High, Moderate, Low, or Planning | High |
{assignee} | Assigned user (blank when unassigned) | Jane Doe |
{created_at} | When the incident was created | 2026-09-10T08:14:02Z |
{closed_at} | When the incident was closed | 2026-09-10T10:02:41Z |
{fixed_at} | When the incident was marked fixed | 2026-09-10T09:55:12Z |
{updated_at} | When the incident was last updated | 2026-09-10T09:20:00Z |
{xyte_link} | Link to the incident in Xyte | https://app.xyte.io/incident/… |
{organization} | Organization name | Acme Corp |
{customer} | Customer (top-level space) name | Acme Retail |
{device} | Device name | Front Lobby Camera |
{device_link} | Link to the device in Xyte | https://app.xyte.io/devices?deviceId=… |
{device_status} | Device status | Offline |
{vendor} | Device vendor | Axis |
{model} | Device model | P3245 |
{submodel} | Device sub-model | P3245-LVE |
{serial} | Device serial number | ACCC8E1F2A3B |
{mac} | Device MAC address | AC:CC:8E:1F:2A:3B |
{ip} | Device IP address | 10.20.30.41 |
{firmware} | Device firmware version | 11.9.62 |
{last_seen} | When the device was last seen | 2026-09-10T08:12:55Z |
{connection} | How the device connects to Xyte | Edge / Zabbix proxy |
{parent} | Parent device name | Floor 3 Switch |
{device_url} | The device's own web interface, when known | https://10.20.30.41 |
{space_name} | Space name (the room itself) | Room 301 |
{space_path} | Full space path of the device | HQ / Floor 3 / Room 301 |
{space_link} | Link to the space in Xyte | https://app.xyte.io/overview/… |
An integration connected before this step existed may show a slightly shorter key list.{fixed_at}and{updated_at}still work if you type them by hand.
Two-way sync (optional)
By default the sync is one-way (Xyte → Freshdesk). To also reflect changes made in Freshdesk — an updated subject/priority, or a resolved/closed ticket — back into Xyte, add an Automation Rule that posts ticket changes to Xyte's webhook.
1. Get the URL and token
Open the Two-way sync step of the Xyte wizard. It shows:
- The Webhook URL to post to (e.g.
https://hub.xyte.io/external/freshdesk/webhook). - A unique Webhook token, generated per integration. It authenticates the request and is sent in the
X-Xyte-Tokenheader. - A ready-to-paste content template (also shown below).
Keep the token secretThe token is a shared secret. Treat it like a password — anyone with it can post ticket updates to your organization. You can rotate it any time by submitting a new value in the wizard.
2. Create the Automation Rule
In Freshdesk:
- Go to Admin → Workflows → Automations, open the Ticket Updates tab and click New rule.
- Under When an action performed by, choose Agent or Requester, and add the events Status is changed, Priority is changed and Subject is changed (any to any).
- Under On tickets with these properties, add the condition Requester → Email → is → your requester email — see the note below.
- Under Perform these actions, choose Trigger Webhook with Request type = POST and paste the Webhook URL from the wizard.
- Check Custom headers and add
X-Xyte-Token: <your webhook token>(use the token from the wizard). - Set Encoding = JSON, choose Advanced content and paste the content template:
{
  "id": {{ticket.id}},
  "subject": "{{ticket.subject}}",
  "status": "{{ticket.status}}",
  "priority": "{{ticket.priority}}"
}- Preview and save. Changes in Freshdesk now sync back to Xyte.
Only sync Xyte's own tickets — filter on the requester emailEvery ticket Xyte creates carries the requester email you configured in the Account step. Adding the Requester → Email is condition makes the rule fire only for tickets that Xyte created. Without it, every ticket change in your helpdesk would be posted to the webhook — Xyte safely ignores tickets it doesn't recognize, but the condition avoids sending the irrelevant traffic at all.
Optional — a correlation custom field
Ticket matching normally uses the Freshdesk ticket ID. If a ticket might be merged or recreated in Freshdesk, you can add a fallback correlation field:
- In Freshdesk, go to Admin → Ticket Fields and create a single-line text field labeled
xyte incident id— Freshdesk derives the API namecf_xyte_incident_idfrom the label (verify the API name in the field's settings). Leave it optional for agents. - In Xyte, re-run the Account step (Save & Connect) so the new field is picked up.
- Add this line to the webhook content template:
"xyte_incident_id": "{{ticket.cf_xyte_incident_id}}"From then on Xyte stamps every new ticket with the incident ID and matching keeps working even if the ticket ID changes.
What syncs back
- Subject and priority changes update the linked Xyte incident.
- A Resolved or Closed status closes the Xyte incident.
The webhook is idempotent and loop-safe on Xyte's side — repeat or echoed events are ignored, so Xyte's own outbound changes won't bounce back.
Verify the integration
- Create a test device incident in Xyte (or wait for a real one) — a matching ticket should appear in Freshdesk within moments, with your configured requester.
- Update the Xyte incident — the Freshdesk ticket's subject/priority should update.
- Resolve the Xyte incident — the Freshdesk ticket should move to your configured close status.
- If you configured two-way sync, update or resolve the ticket in Freshdesk and confirm the change reflects back in Xyte. (Automation rules run asynchronously — allow a minute or two.)
Optional — set up a free test account
To trial the integration without touching production, create a free Freshdesk account:
- Go to freshdesk.com and start a free trial (or use the free plan).
- Your trial subdomain and your profile's API key are all you need for the Account step.
Troubleshooting
- Connection test fails (401) — wrong API key or subdomain. Enter the subdomain only (no
https://, no.freshdesk.com), and copy the key from the agent's Profile Settings → View API Key. - Tickets aren't created — confirm the agent whose API key you used can create tickets, and that the integration is enabled. If your account requires custom fields on ticket creation, map them in the Ticket Fields step.
- Tickets aren't resolved/closed — your account likely requires fields on closure. Set them under Required-for-closure fields in the Ticket Fields step, or use Resolved instead of Closed as the close status.
- Freshdesk changes don't reach Xyte — check the automation rule is enabled, the change matches one of the rule's events (status/priority/subject), the ticket matches the Requester email condition, and the
X-Xyte-Tokenheader matches the wizard token. Freshdesk runs update automations asynchronously — allow a minute or two. The ticket's activity log in Freshdesk shows whether the rule executed.
Updated 29 days ago