
Webhook Destination Configuration
Configure Xyte's outbound webhook for a specific destination service — Rootly and SolarWinds.
Configure Xyte's outbound webhook for a specific destination service.
👉 Pick your service: use the Rootly / SolarWinds tabs below.
Rootly receives Xyte incidents through its Generic Webhook alert source. Xyte pushes each incident create, update and close to a URL Rootly generates for you.
Part 1 — Create the alert source in Rootly
- In Rootly, go to Alerts → Sources.
- Click + New Source and choose Generic Webhook.
- Give the source a name (for example,
Xyte) and pick an Owning Team. - Open Connection Instructions on the source. Rootly shows:
- the URL to post to —
https://webhooks.rootly.com/webhooks/incoming/generic_webhooks - an Authorization Header — Scheme (
Bearer) and Credentials (your secret)
- the URL to post to —
- Choose how alerts are routed: In-App Routing (route inside Rootly) or Direct Routing (encode the target in the URL).
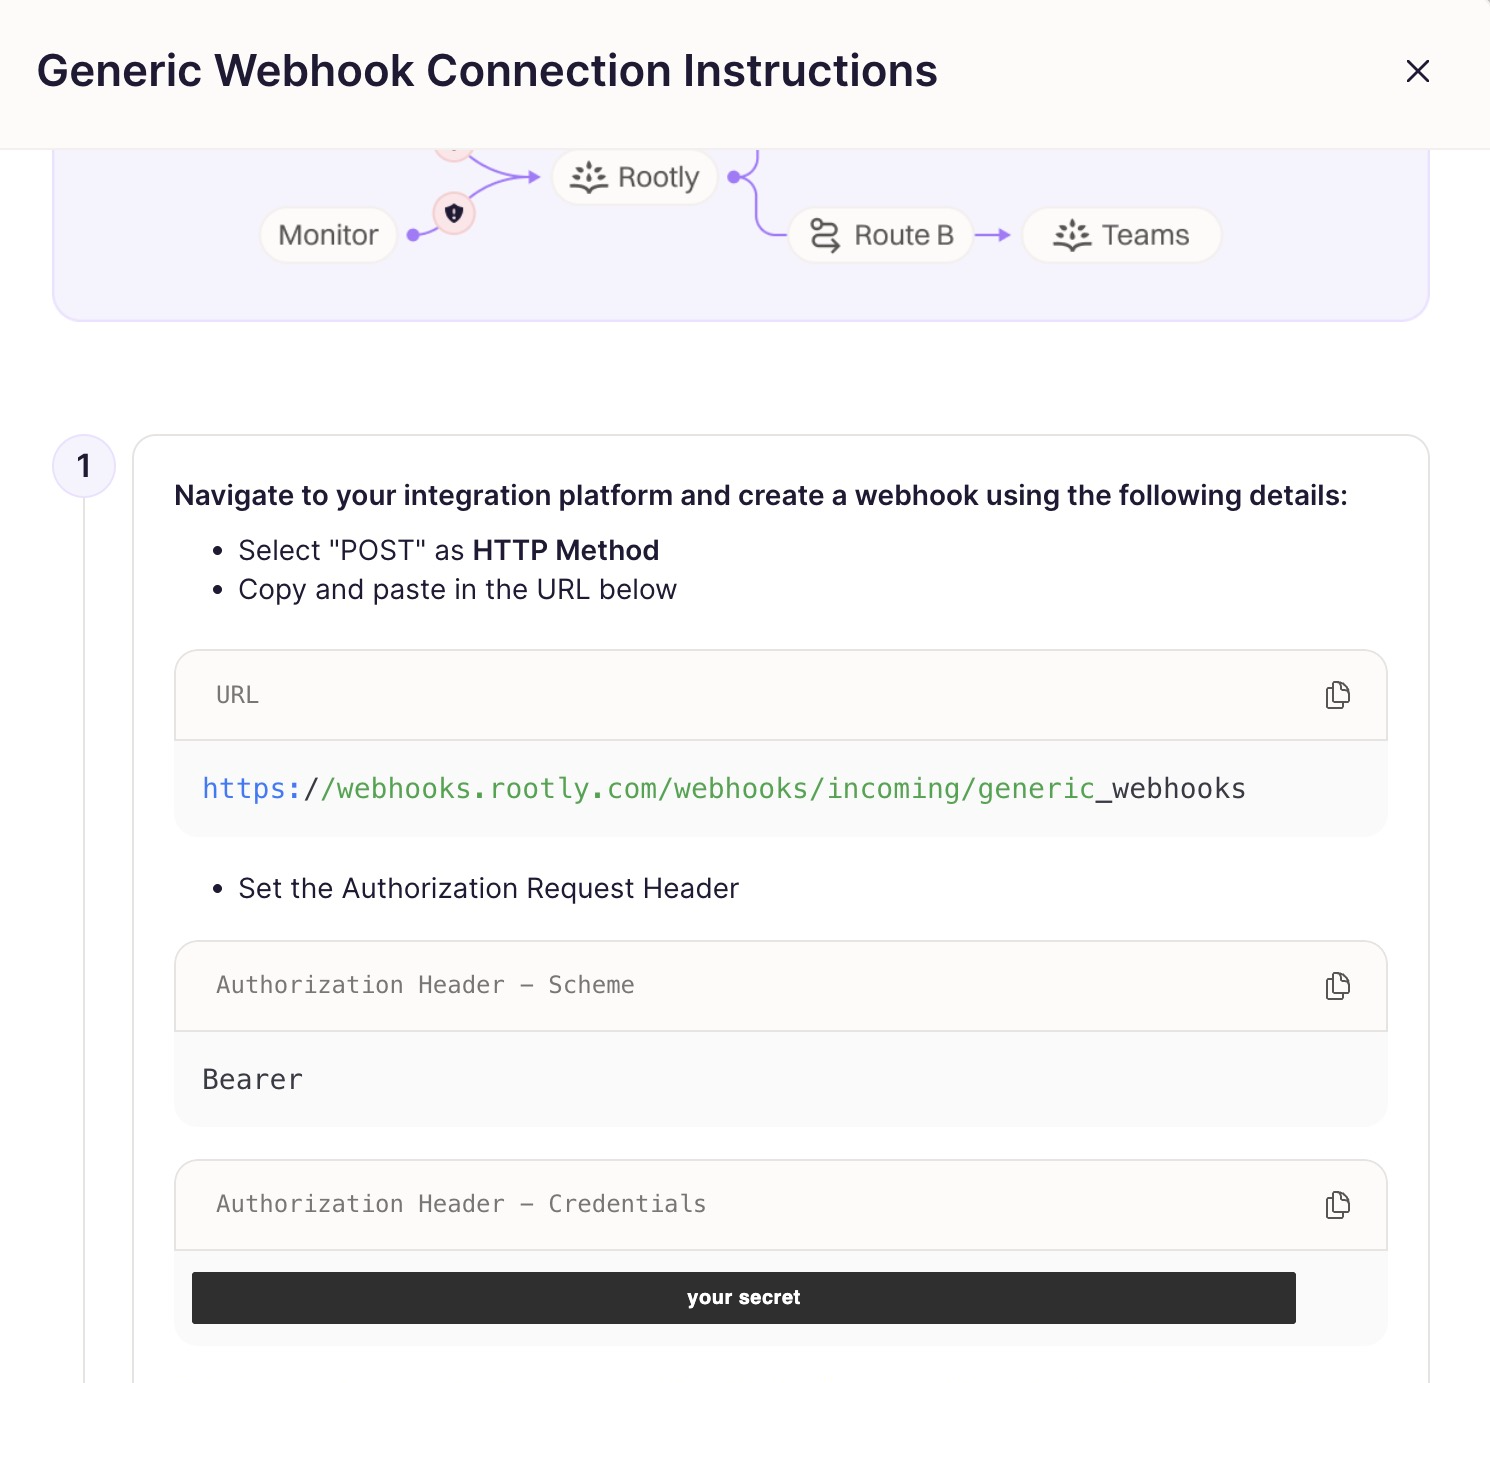
Part 2 — Configure the webhook in Xyte
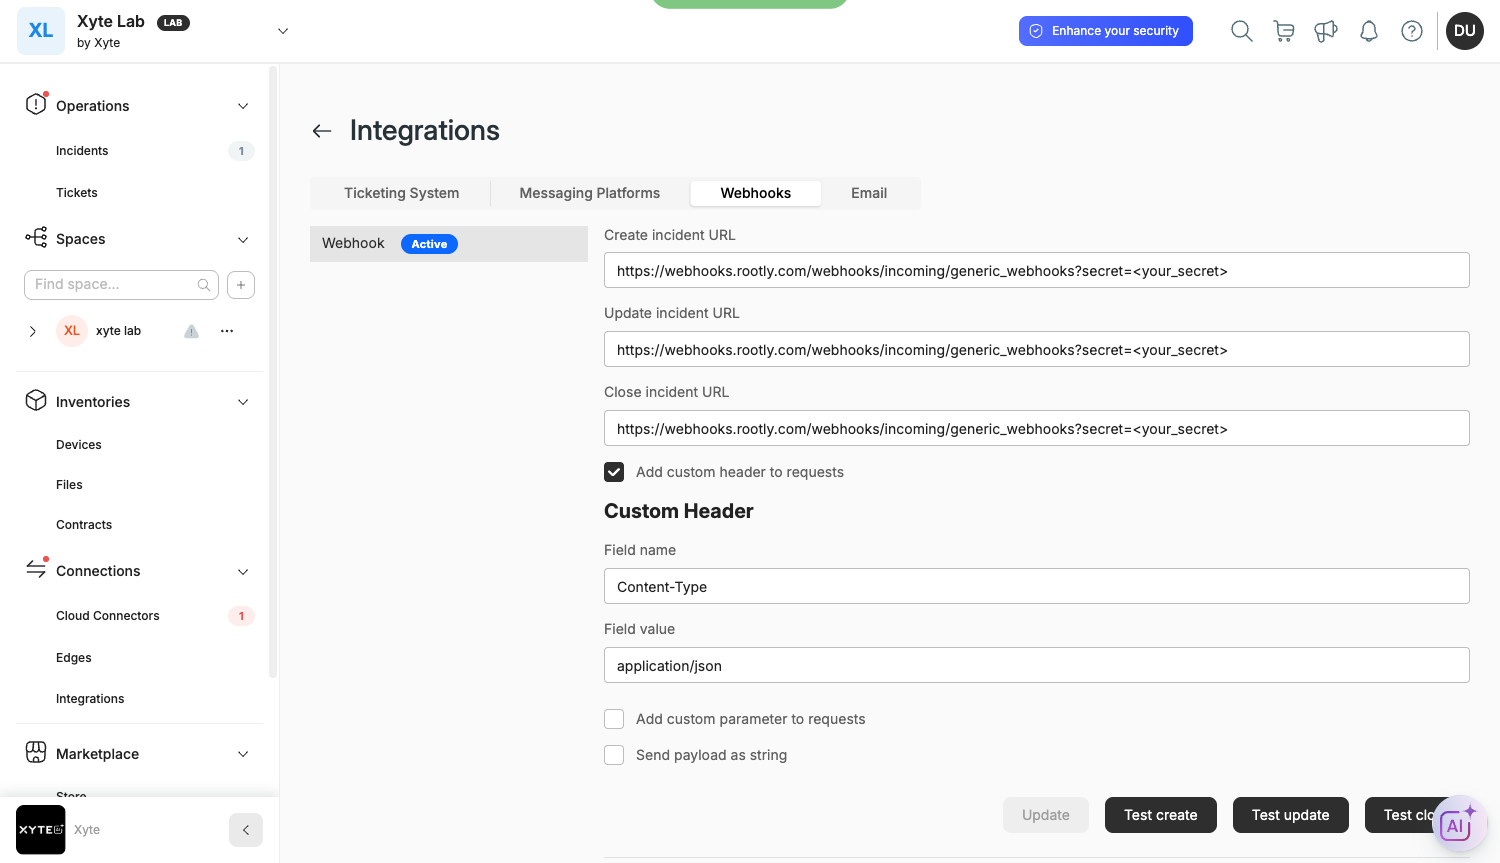
In the Xyte organization portal go to Connections → Integrations → Webhooks, then:
| Field | Value |
|---|---|
| Create / Update / Close incident URL | https://webhooks.rootly.com/webhooks/incoming/generic_webhooks?secret=<your_secret> |
| Add custom header to requests | Checked |
| Custom Header — Field name | Content-Type |
| Custom Header — Field value | application/json |
Pass the secret as a query string parameter at the end of the URL, not as a header.
Why the query string, when Rootly recommends a Bearer header?Xyte sends only one custom header, and it is needed for
Content-Type: application/json.
There is no second header available forAuthorization, so use the?secret=form, which Rootly supports for exactly this case.
Supported endpoint formats
| Format | URL |
|---|---|
| Base endpoint | https://webhooks.rootly.com/webhooks/incoming/generic_webhooks |
| Fixed target endpoint | https://webhooks.rootly.com/webhooks/incoming/generic_webhooks/notify/<type>/<id> |
Both formats support the ?secret=<value> query parameter for authentication.
Common misconfiguration
Do not use the custom header to pass the secret. Use the custom header only for Content-Type: application/json. If the secret is sent in an unsupported format, the webhook shows an Error status and delivery fails.
| Field name | Field value | |
|---|---|---|
| Incorrect | Bearer | <secret> |
| Incorrect | Authorization | Bearer <secret> |
| Correct | Content-Type | application/json |
Part 3 — Map the payload fields in Rootly
Do not skip this step. Without it every Xyte incident appears in Rootly as an alert literally titled "Alert", with an empty description — even though the correct title is present in the payload Rootly received.
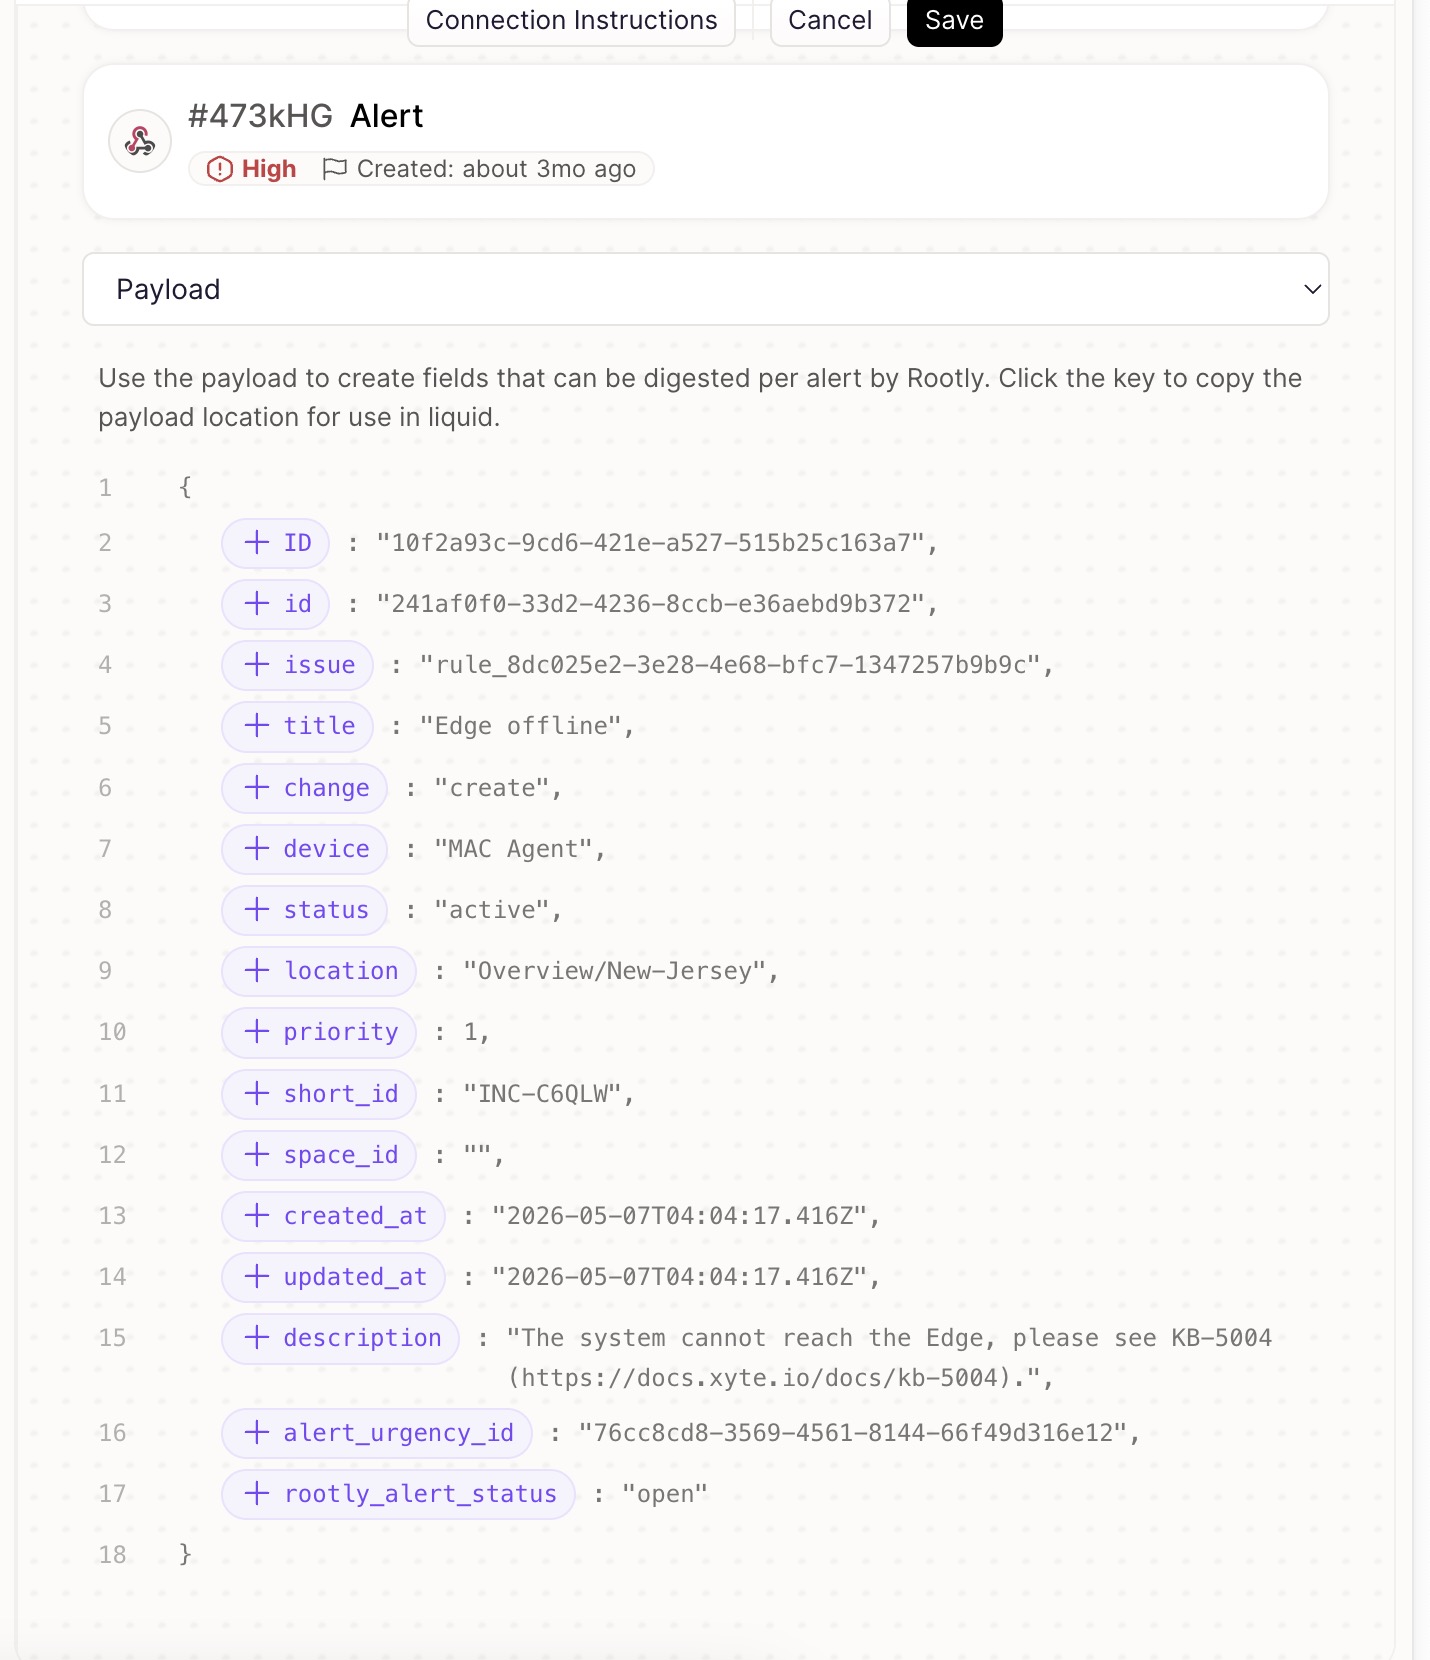
Rootly does not guess which JSON key is the title. On the alert source, open the Fields tab. It contains three default fields — Title, Description and Source Link — which are empty until you fill them in, using liquid variables to read from the Xyte payload:
| Rootly field | Value | Result |
|---|---|---|
| Title | {{ alert.data.title }} | Edge offline instead of Alert |
| Description | {{ alert.data.description }} | The incident description |
| Source Link | your Xyte incident URL | Click-through back to Xyte |
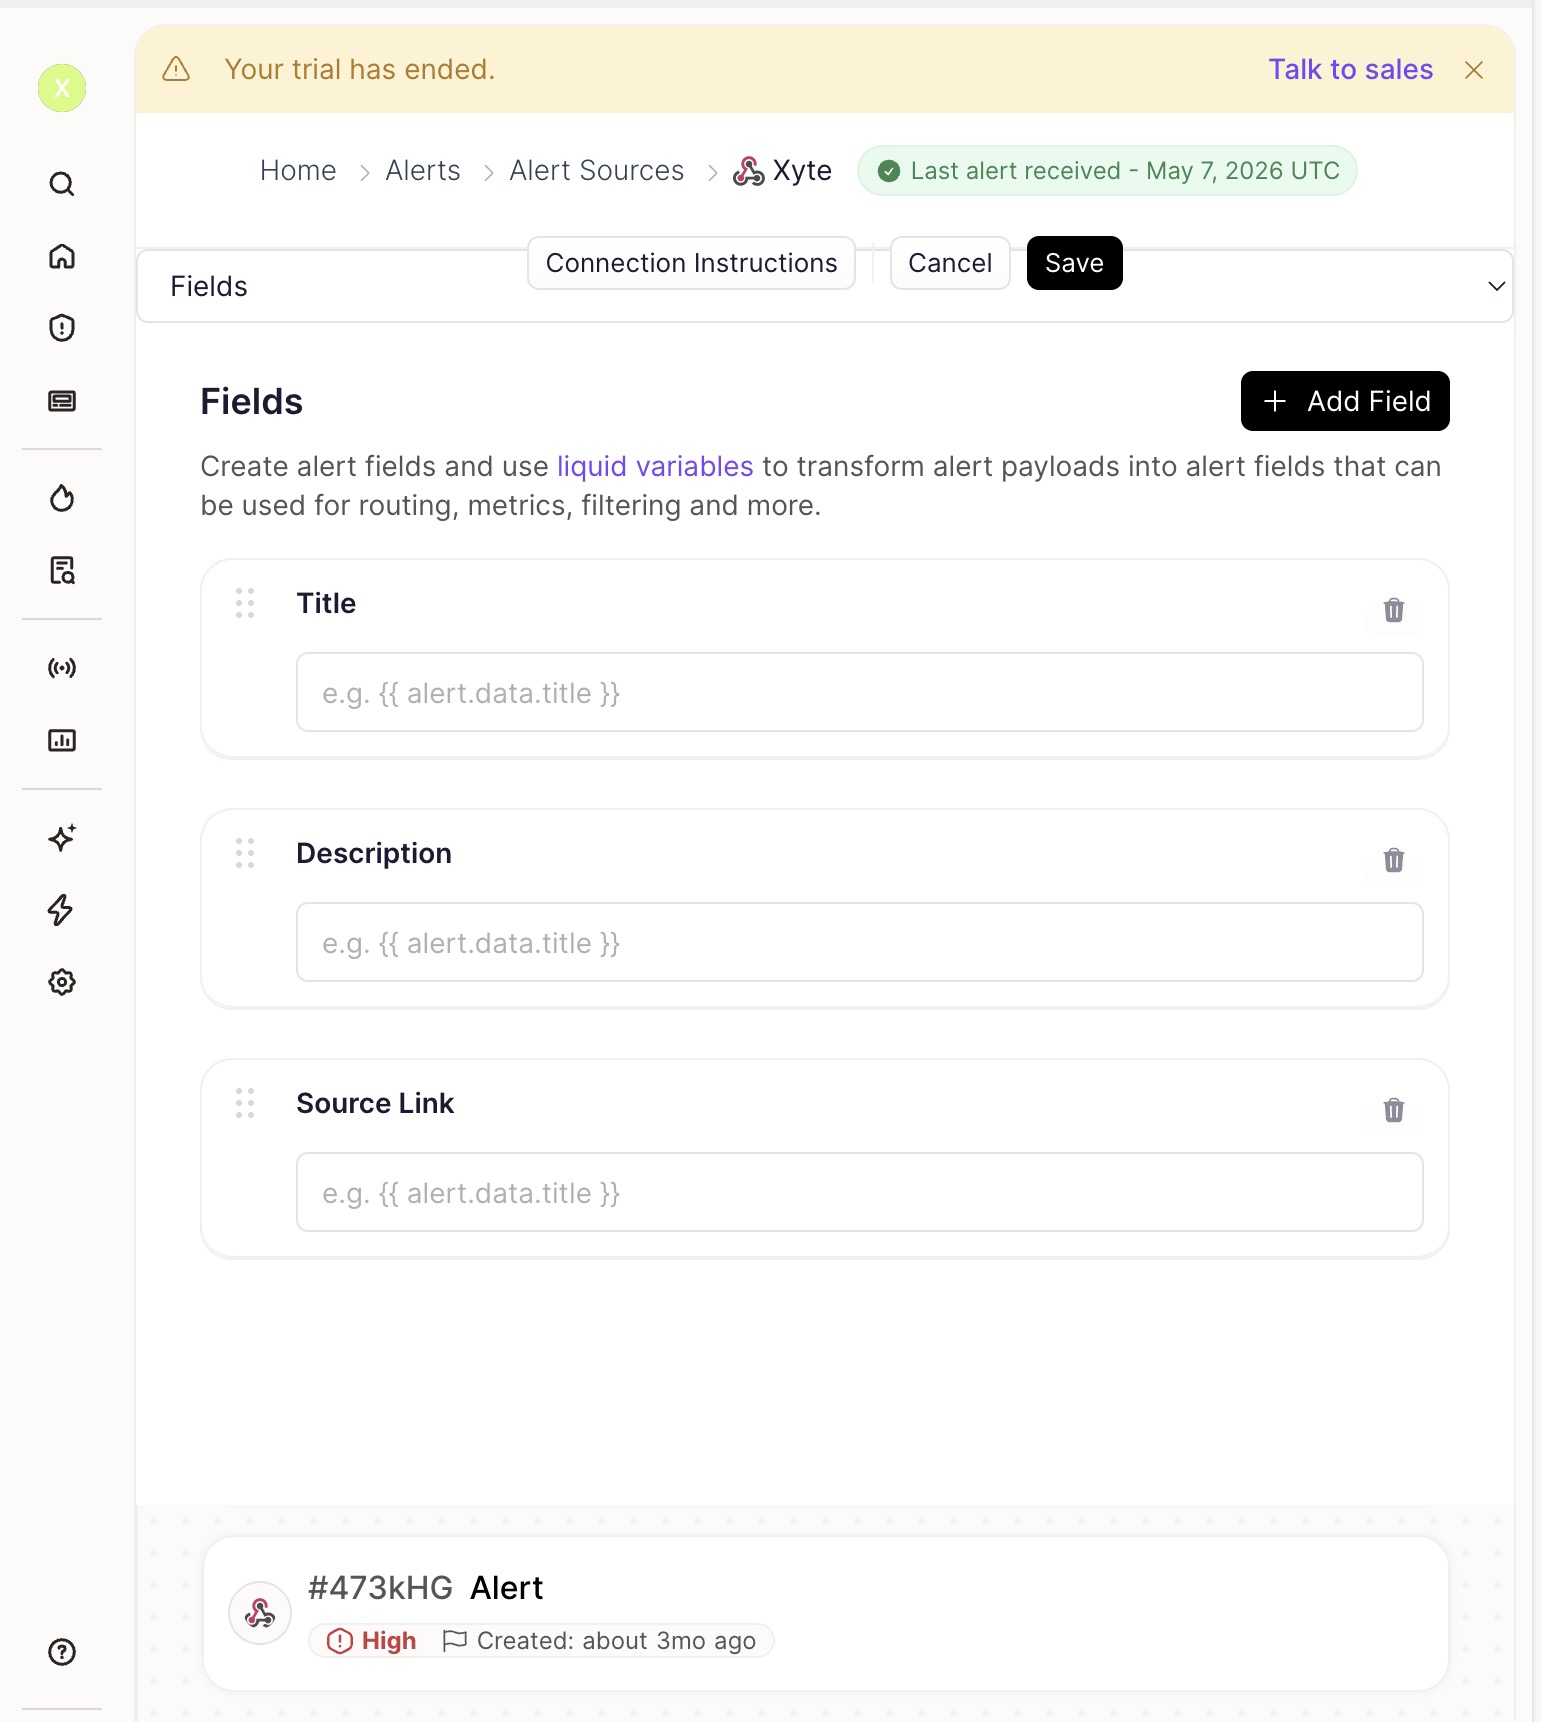
You can confirm the mapping on the same screen: pick any received alert, then switch between the Payload and Alert Fields panels to see the raw JSON next to the fields Rootly derived from it.
Part 4 — Deduplicate and auto-resolve
By default each Xyte create, update and close becomes a separate alert in Rootly, and closing an incident in Xyte does not resolve anything. The alert source's Events tab fixes both:
- Unique Identifier — set to
$.short_id. This is the Xyte incident number (INC-E6Q9D), identical across that incident's create, update and close. - Combine duplicate alerts into one alert — on. Updates fold into the original alert instead of stacking.
- Auto-Resolve alerts — on. Then add a Resolution Condition matching the close event, for example
$.changeequalsclose(or$.statusequalsclosed).
With those set, one Xyte incident produces one Rootly alert that resolves itself when the incident closes in Xyte.
Part 5 — Verify
Click Test create, Test update and Test close in Xyte — each should report Test connection successful. Then open Alerts in Rootly and confirm new alerts appear against the source, carrying the mapped title.
What Xyte sends
A real incident as received by Rootly:
{
  "id": "5cd69a13-0373-47a0-05c9-f77a4025d7cf",
  "title": "Edge offline",
  "change": "close",
  "device": "MAC Agent",
  "status": "closed",
  "issue": "rule_8dc02e2-3e20-4e60-bfc7-13472379369c",
  "location": "Overview/New-Jersey",
  "priority": 1,
  "short_id": "INC-N633D",
  "space_id": "",
  "created_at": "2026-05-07T03:22:16.889Z",
  "updated_at": "2026-05-07T01:48:25.820Z"
}
change is create, update or close. The body is fixed — fields cannot be renamed on the Xyte side, which is why the mapping in Part 3 happens in Rootly.
Additional resources
Before you start: which SolarWinds do you have?
"SolarWinds" covers several products, and they connect to Xyte in opposite directions.
| Your product | Direction | What to set up |
|---|---|---|
Incident Response (incidents.*.cloud.solarwinds.com) | Xyte pushes to SolarWinds | The webhook below |
| Observability SaaS | Xyte pushes to SolarWinds | The webhook below, using your ingest URL and token |
| Observability Self-Hosted / Hybrid Cloud Observability / NPM (Orion, on-premises) | SolarWinds pulls from Xyte | An API Poller — see the ⬅️ OUTBOUND tab |
Self-hosted SolarWinds has no inbound webhook receiver, and Xyte does not send webhooks to private network addresses.
👉 Choose your direction using the two tabs below. Inbound is what most customers want.
Part 1 — Generate the incoming webhook URL in SolarWinds
- Sign in to SolarWinds Incident Response:
- US region —
https://incidents.na-01.cloud.solarwinds.com - EU region —
https://incidents.eu-01.cloud.solarwinds.com
- US region —
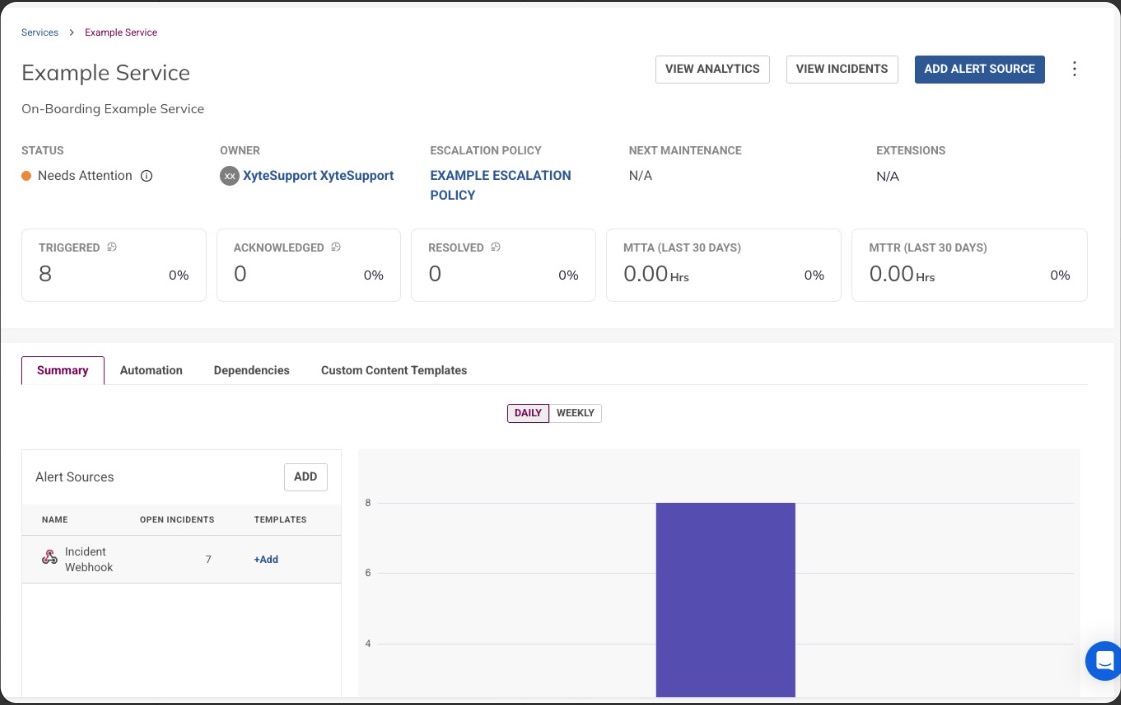
- In the left sidebar, open Services.
- Open the service that should receive Xyte alerts, or create one with ADD NEW SERVICE.
- On the service page, click ADD ALERT SOURCE. If the service already has alert sources, use ADD in the Alert Sources card instead.
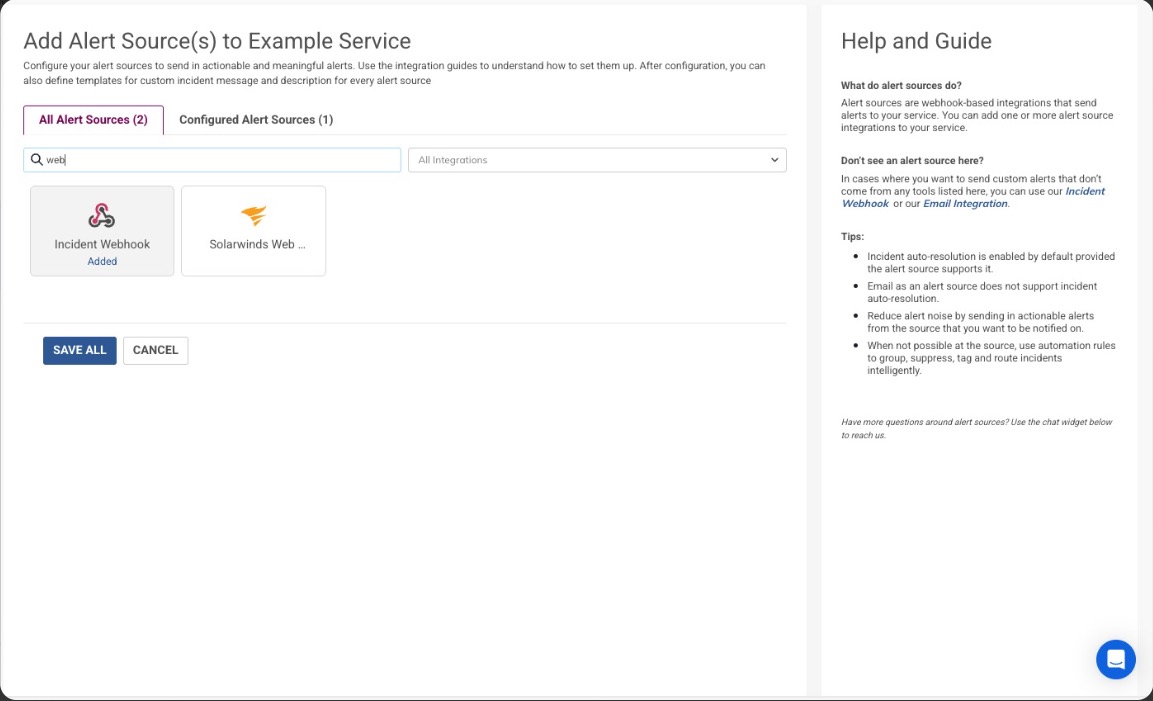
- In the search box, type
webhookand select Incident Webhook.
Do not pick the Solarwinds Webhook card. That alert source ingests alerts from SolarWinds Orion into Incident Response and is unrelated to Xyte. The card you want is Incident Webhook.
- A panel opens on the right showing a generated Webhook URL:
https://api.squadcast.com/v2/incidents/api/<your-unique-token>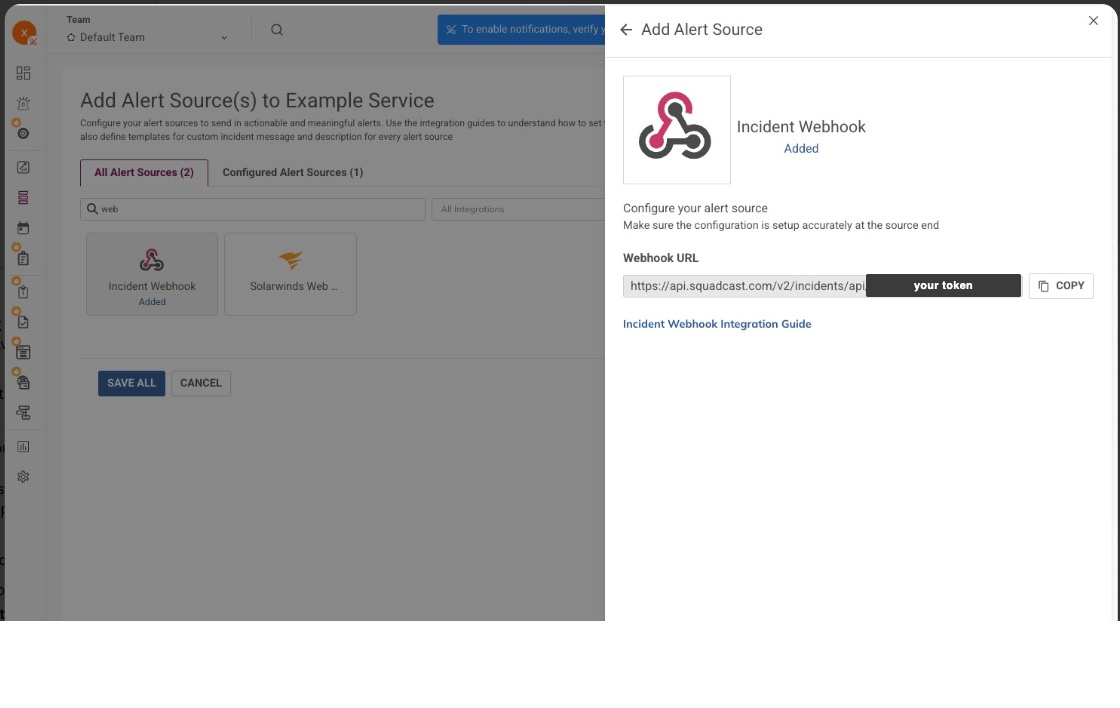
- Click ADD ALERT SOURCE, then SAVE ALL.
- Use the COPY button next to the Webhook URL — you need it for Part 2.
The URL contains your token. Treat it as a secret: anyone holding it can raise alerts in your SolarWinds account.
Part 2 — Use the URL in Xyte
- In the Xyte organization portal, go to Connections › Integrations.
- Open the Webhooks tab, then select Webhook.
- Paste the SolarWinds URL into all three fields:
- Create incident URL
- Update incident URL
- Close incident URL
- (Optional) Tick Add custom header to requests and set:
| Field name | Field value |
|---|---|
Content-Type | application/json |
- (Optional) Under Filter incidents by priority, set the minimum priority to report, so only incidents at or above that priority reach SolarWinds.
- Click Update. The integration status changes to Active.
- Click Test create, Test update and Test close. Each should show Test connection successful.
Part 3 — Map the incident message in SolarWinds
Do not skip this step. Without it every Xyte incident appears in SolarWinds as Generic Webhook Alert, with no device or incident name — even though the correct title is in the payload SolarWinds received. Nothing warns you: delivery reports success on both sides.
SolarWinds reads a field called message; Xyte sends title. Map them with Custom Content Templates:
- Open the service, then the Custom Content Templates tab.
- In the Alert Sources card, click +Add in the TEMPLATES column next to Incident Webhook.
- Choose Incident Webhook as the alert source. The panel on the right lists the keys from a real received payload — click one to insert it.
- Set:
| Template field | Use |
|---|---|
| Incident Message | title |
| Incident Description | description |
- Save. New incidents then arrive with the Xyte incident title instead of Generic Webhook Alert.
Part 4 — Verify
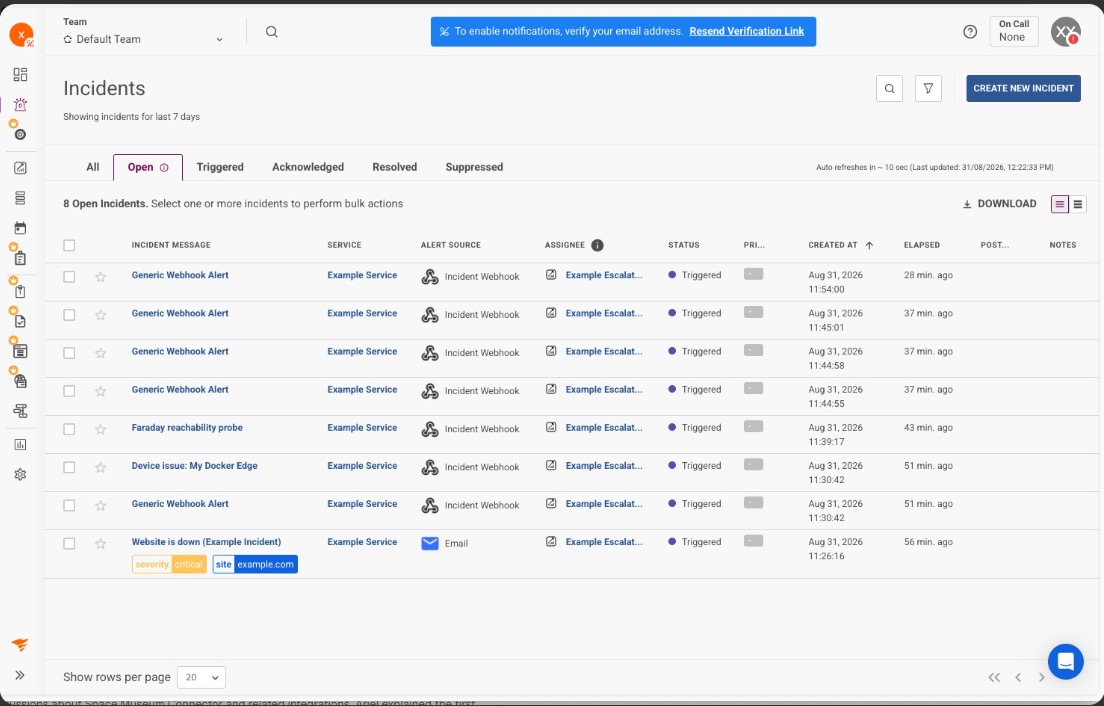
In SolarWinds, open Incidents. Within a few seconds you should see new entries whose Alert Source is Incident Webhook, on the service you configured.
You can also confirm from the service page itself: the Alert Sources card lists Incident Webhook with a running count under OPEN INCIDENTS.
Known limitations
- Closing an incident in Xyte does not resolve it in SolarWinds. A close sends another event that SolarWinds records as a new Triggered alert, because SolarWinds expects
trigger/resolvewhile Xyte sends its own status values. Custom Content Templates cover the incident message and description only — there is no status field — so this cannot be corrected on the SolarWinds side either.
The practical effect is that the SolarWinds queue grows and does not clear itself, so do not rely on it for incident lifecycle. Either resolve alerts in SolarWinds manually, or route the Xyte webhook through an automation tool that rewrites the body before forwarding it.
What Xyte sends
{
  "change": "create",
  "location": "HQ > Floor 2 > Room 210",
  "device": "Meeting Room Display",
  "id": "ec185c0b-dc6c-46a4-ab0f-b75fdfd9c5ee",
  "short_id": "INC-E6Q9D",
  "title": "Device issue: Meeting Room Display",
  "status": "active",
  "priority": 3,
  "description": "Device stopped reporting",
  "issue": "device_offline",
  "created_at": "2026-08-31T08:03:34.247Z",
  "updated_at": "2026-08-31T08:03:34.247Z"
}
change is create, update or close. space_id is included when the space has a custom ID.
Requirements for any webhook destination
- The URL must use https. Plain
httpis rejected. - The destination must be reachable on the public internet. Private, loopback and link-local addresses are rejected, including hostnames that resolve to an internal address.
- The body is fixed — fields cannot be renamed or re-mapped. One extra key/value pair can be added with the custom parameter option.
- Only one custom header is sent. Destinations requiring two or more — such as SolarWinds Service Desk, which needs both an authorization header and an
Acceptversion header — cannot be used directly and need a relay.
Not yet verified end to end. The inbound flow on the other tab was tested against a liveSolarWinds account. This outbound configuration is a reference built from the SolarWinds API Poller
screens and the Xyte API, but no poller has been run againsthub.xyte.ioyet. Treat the exact field
values as a starting point and confirm them in your own environment.
Poll Xyte from self-hosted SolarWinds
In Xyte, copy your organization API key from Settings. Then in SolarWinds go to Settings › All Settings › Manage API Pollers › New and configure:
| Field | Value |
|---|---|
| Method | GET |
| Request URL | https://hub.xyte.io/core/v1/organization/incidents?status=active |
Header Authorization | your organization API key |
Header Accept | application/json |
Click Send request, then use Stored Values to select the fields SolarWinds should monitor. Assign the poller to a node and set a polling interval.
Supported query parameters: status (active / closed), priority (critical / high / moderate / low / planning), from and to (unix time), page, per_page.
API Pollers monitor selected values from the response, so they suit counts and statuses better than full incident text.
Updated about 1 month ago